> For the complete documentation index, see [llms.txt](https://help.gpmloginapp.com/llms.txt). Markdown versions of documentation pages are available by appending `.md` to page URLs; this page is available as [Markdown](https://help.gpmloginapp.com/gpm-login-global-en/gpm-login-global-user-guide/profiles.md).
# Profiles
{% hint style="success" %}
***GPMLogin tip:*** Do you need detailed instructions? Watch the video on our official channel [**YouTube Channel**](#user-content-fn-1)[^1]
{% endhint %}
#### There are 2 ways to create a Profile.
#### 1. Add New
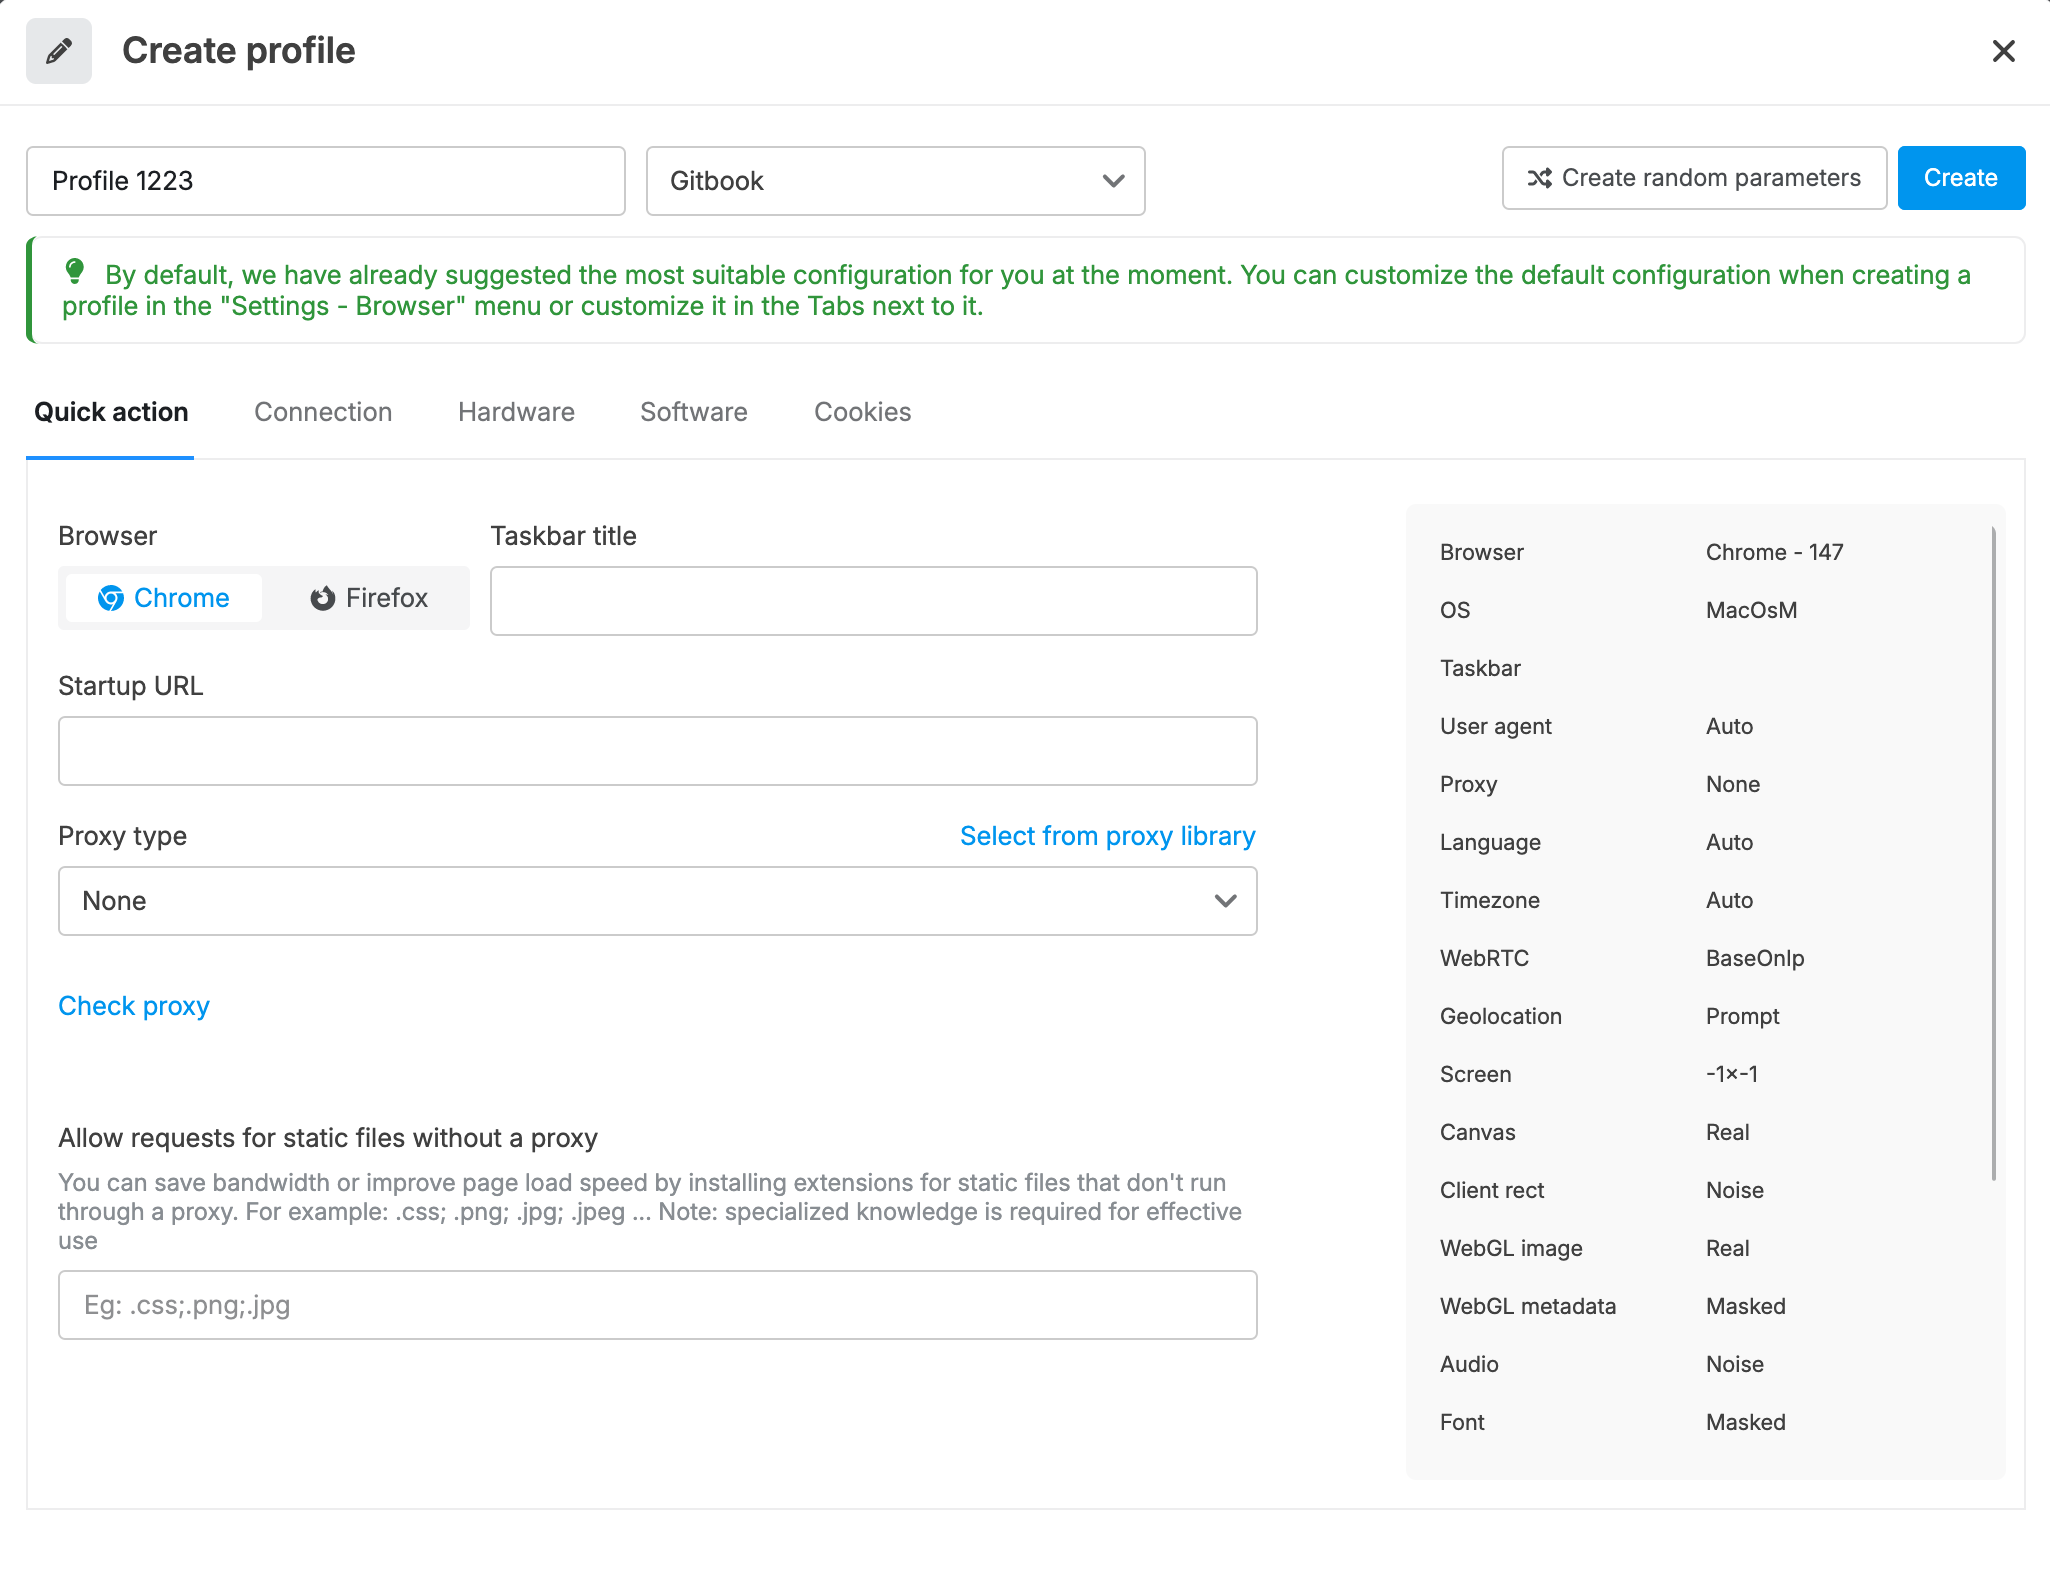
* Click the Create button to create a new profile.
* Note: This method is suitable for creating a small group of profiles, requiring detailed configuration for each profile.
* Profile 1223: Profile name.
* Gitbook: Group.
* Create random parameters: The software will automatically generate a new Fingerprint.
**Quick action** provides quick settings to initialize a browser profile, including:
* **Browser**: Chrome, Firefox.
* **Taskbar Title**: Set the display name on the taskbar when running the profile.
* **Startup URL**: The URL that will automatically open when the profile starts.
* *Example:* `https://google.com https://facebook.com`
* *There is a space between the URLs. This only applies to Chrome, as Firefox does not support multiple Startup URLs at the same time.*
**Proxy Type**: Set the proxy for the profile.
* None → Do not use a proxy.
* Or choose from: HTTP, SOCKS4, SOCKS5, Route Proxy (Rotating proxy services built into the software).
* Select from proxy library: Proxy from the library.
***
**Connection** configures the parameters related to the network, location, and how the browser handles protocols that pose a risk of leaking your real IP address.
**WebRTC handle**
* Base on IP (Recommended): The system will automatically spoof the WebRTC IP address to perfectly match the IP of the Proxy you are using. This is the safest configuration and bypasses most detection systems.
* Fixed: Allows you to manually enter a specific WebRTC IP address.
* Real: Uses the actual IP address of your network device. Absolutely do not use this option if you are using a Proxy to remain anonymous.
* Disabled: Completely turns off the WebRTC protocol. Although this thoroughly prevents IP leaks, some websites (like Discord, Google Meet, or strict anti-fraud platforms) may mark your browser as suspicious if they detect WebRTC is disabled.
**Timezone**
* Check "Timezone is set according to the geographical location corresponding to the Proxy IP": (Recommended) When you enable this feature, the system will automatically analyze your Proxy IP (e.g., an IP in New York) and automatically change the browser's timezone to match that location.
**Geo location**
* Prompt (Recommended): The browser will display a notification asking for your permission before allowing the website to get your location (Most similar to the natural behavior of a real user).
* Allow: Automatically grants location permission to all requesting websites.
* Disabled: Rejects all location requests from websites.
**Block port scan**
Some websites use local network (Localhost) scanning scripts to see if you have specific software ports open (for example: remote control software like TeamViewer, AnyDesk, or Anti-detect software itself). If detected, they may mark your account as risky. This feature helps you block websites from scanning system ports:
* Block all: Enter `127.0.0.1` into the blank box to block all internal port scanning requests.
* Block specific ports: Enter a list of ports you want to block, separated by a semicolon `;`. *For example, the default configuration is blocking ports:* `3389;5900;19995;9495;9496` *(These are typically ports for Remote Desktop, VNC, and automation software).*
***
**Hardware** allows you to deeply intervene in simulating the physical parameters of the computer device (such as Graphics Card, CPU, RAM, Screen...). Accurately configuring this area helps your Profile camouflage as a completely new and independent device, preventing websites from tracking your hardware fingerprint (Hardware Fingerprinting).
**Screen resolution**
* Note: You should choose a resolution smaller than or equal to the actual screen resolution of the computer you are using. If you choose a resolution larger than the real screen, websites can easily detect the anomaly (because a smaller screen cannot be scaled up to a ratio larger than the actual hardware).
**Graphics & Audio Fingerprint**
Websites often use hidden APIs to draw a graphic image (Canvas/WebGL) or play an audio snippet (Audio Context), then read the results back to create a unique "fingerprint" for your device. The system provides the following processing modes:
* Real: Returns the actual parameters of the computer. (Many current anti-bot systems are very sensitive to noise injection, therefore leaving it as *Real* is in some cases safer and more natural).
* Noise: The system will actively add random noise signals at the system level to the returned results, causing the fingerprint to be completely changed compared to the original machine.
* Block: Completely blocks the website from retrieving this data.
**WebGL metadata**
Allows you to spoof information about the manufacturer and the Graphics Card (GPU) model in use.
* Masked: You can choose the provider (For example: `Google Inc. (NVIDIA)`) and a specific Card model in the two drop-down menus below (For example: `ANGLE (NVIDIA, NVIDIA GeForce RTX 2060...)`). This makes your Profile look like it is running on a computer with a high-end discrete Graphics Card.
* Real: Displays the exact real graphics card of your computer.
**System Specs**
* Hardware concurrency: Spoofs the number of CPU processing threads (For example: 2, 4, 8, 16, 64...).
* Memory devices: Spoofs the device's RAM capacity (For example: 2GB, 4GB, 8GB...).
**Media & Peripherals**
* Masked media devices: Check to spoof the parameters of media devices (Camera, Microphone, Speaker) on the computer.
* Bluetooth: Enable/Disable the Bluetooth recognition protocol on the browser.
* Hide Media Devices: Turning on this switch will block websites from detecting your audio/recording devices. Important note: If your project requires permission for Video calls, Voice calls, or performing facial scanning KYC tasks, you MUST turn this feature OFF.
**MAC address**
The physical address of the Network Card. When you create a Profile, the system will automatically generate a random and completely valid MAC address (as shown in the right column `32:56:F6:F2:4A:FB`).
***
**Software** configures the foundational parameters for the Profile, including the operating system, browser engine, and other software identification characteristics. These parameters determine how your Profile "declares" its identity to websites when visited.
**Browser**
Allows you to select the browser engine type and the version you want to simulate.
* Browser engine: You can choose between the Chrome (Chromium) or Firefox engine.
* Version: The drop-down menu allows you to choose different browser versions (For example, in the image is version `147.0.7727.56`). The system usually defaults to selecting the newest and most popular version to help your Profile blend into the crowd of real users naturally.
**OS - Operating System**
* Windows
* Mac (Intel): Simulates an older Mac running an Intel chip.
* Mac (Apple Chip): Simulates a new-generation Mac running an M-series chip (M1, M2, M3...).
* Linux
* Android: Simulates the web browsing environment on an Android mobile device.
**User-Agent**
User-Agent is a text string that the browser sends to the web server, containing information about the browser type, version, and operating system.
* Default (Unchecked): The system will automatically generate an accurate User-Agent string that perfectly matches the Browser engine and Operating System you selected above.
* Change User-Agent: Check this box if you want to manually enter a specific User-Agent string for your project.
**Font**
Each operating system (Windows, macOS, Linux) has a different list of default installed fonts. Websites can read this font list to verify if the operating system you declared is truthful or not.
* Masked (Recommended): The system will automatically provide an accurate font list matching the Operating System you selected in section 2, helping to increase the Trust score for the Profile.
* Real: The browser will strictly use the existing font list on your real computer.
**Language**
The inconsistency between the IP location and the browser language is a basic error easily detected by risk-scanning systems.
* Check "Set language based on proxy IP": (Recommended) When enabled, the system will automatically check the geographical location of the Proxy attached to the Profile and automatically set the browser language to match that country (For example: Using a US Proxy, the browser will automatically switch to English `en-US`).
**Device name**
The system will automatically generate a random but valid computer name in a standard format (For example: `LAPTOP-CTG1A7T`).
***
**Cookies** Import cookies in JSON format directly when creating a profile.
#### 2. Bulk Create
The Bulk Create feature has 2 options: By Quantity and From Excel File.
**Bulk Create - By Quantity**
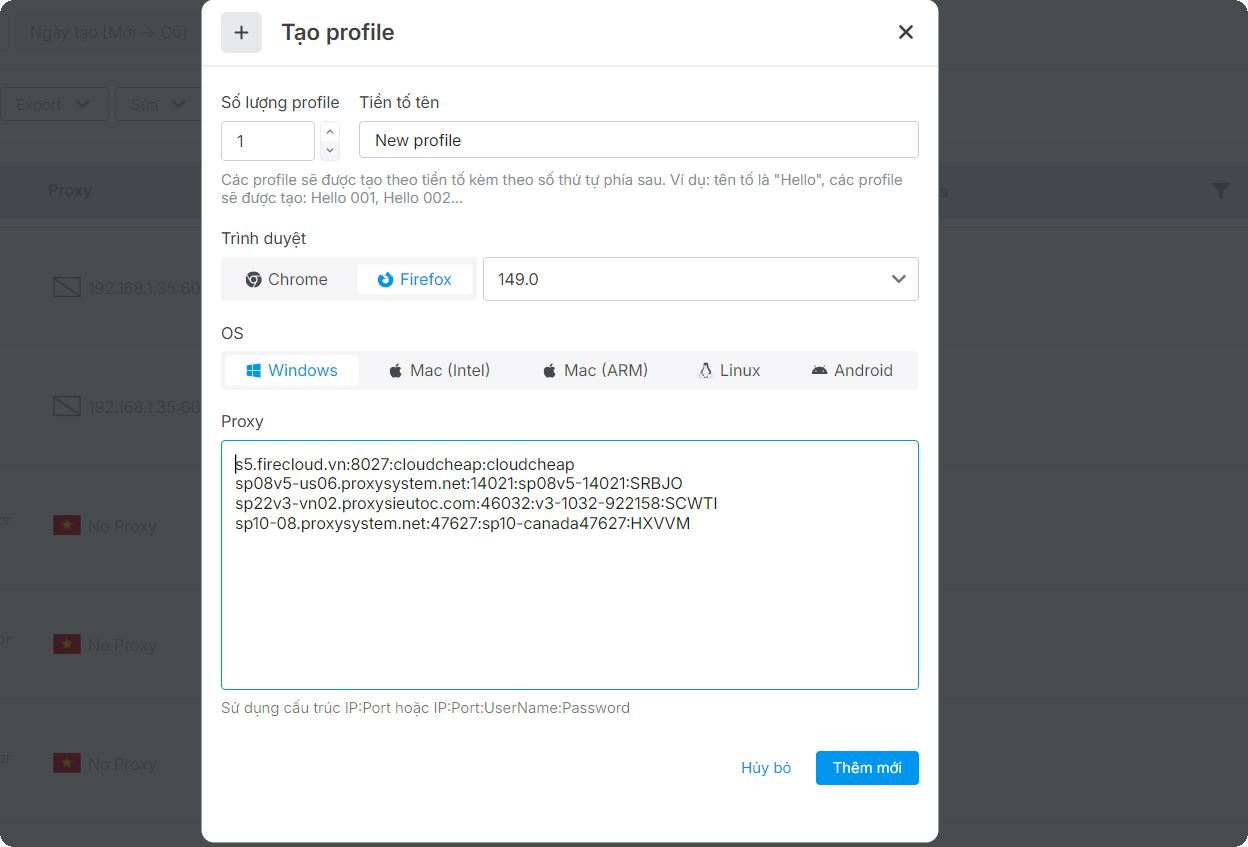
* Enter the number of profiles you want to create.
* Enter the prefix name of the profiles.
* Enter the corresponding proxies for each profile (one proxy per line).
* Select the browser version.
* Note: You can create an unlimited number of profiles at the same time. However, for the system to process faster, you should create a moderate number of profiles each time.
**Bulk Create - From Excel File**
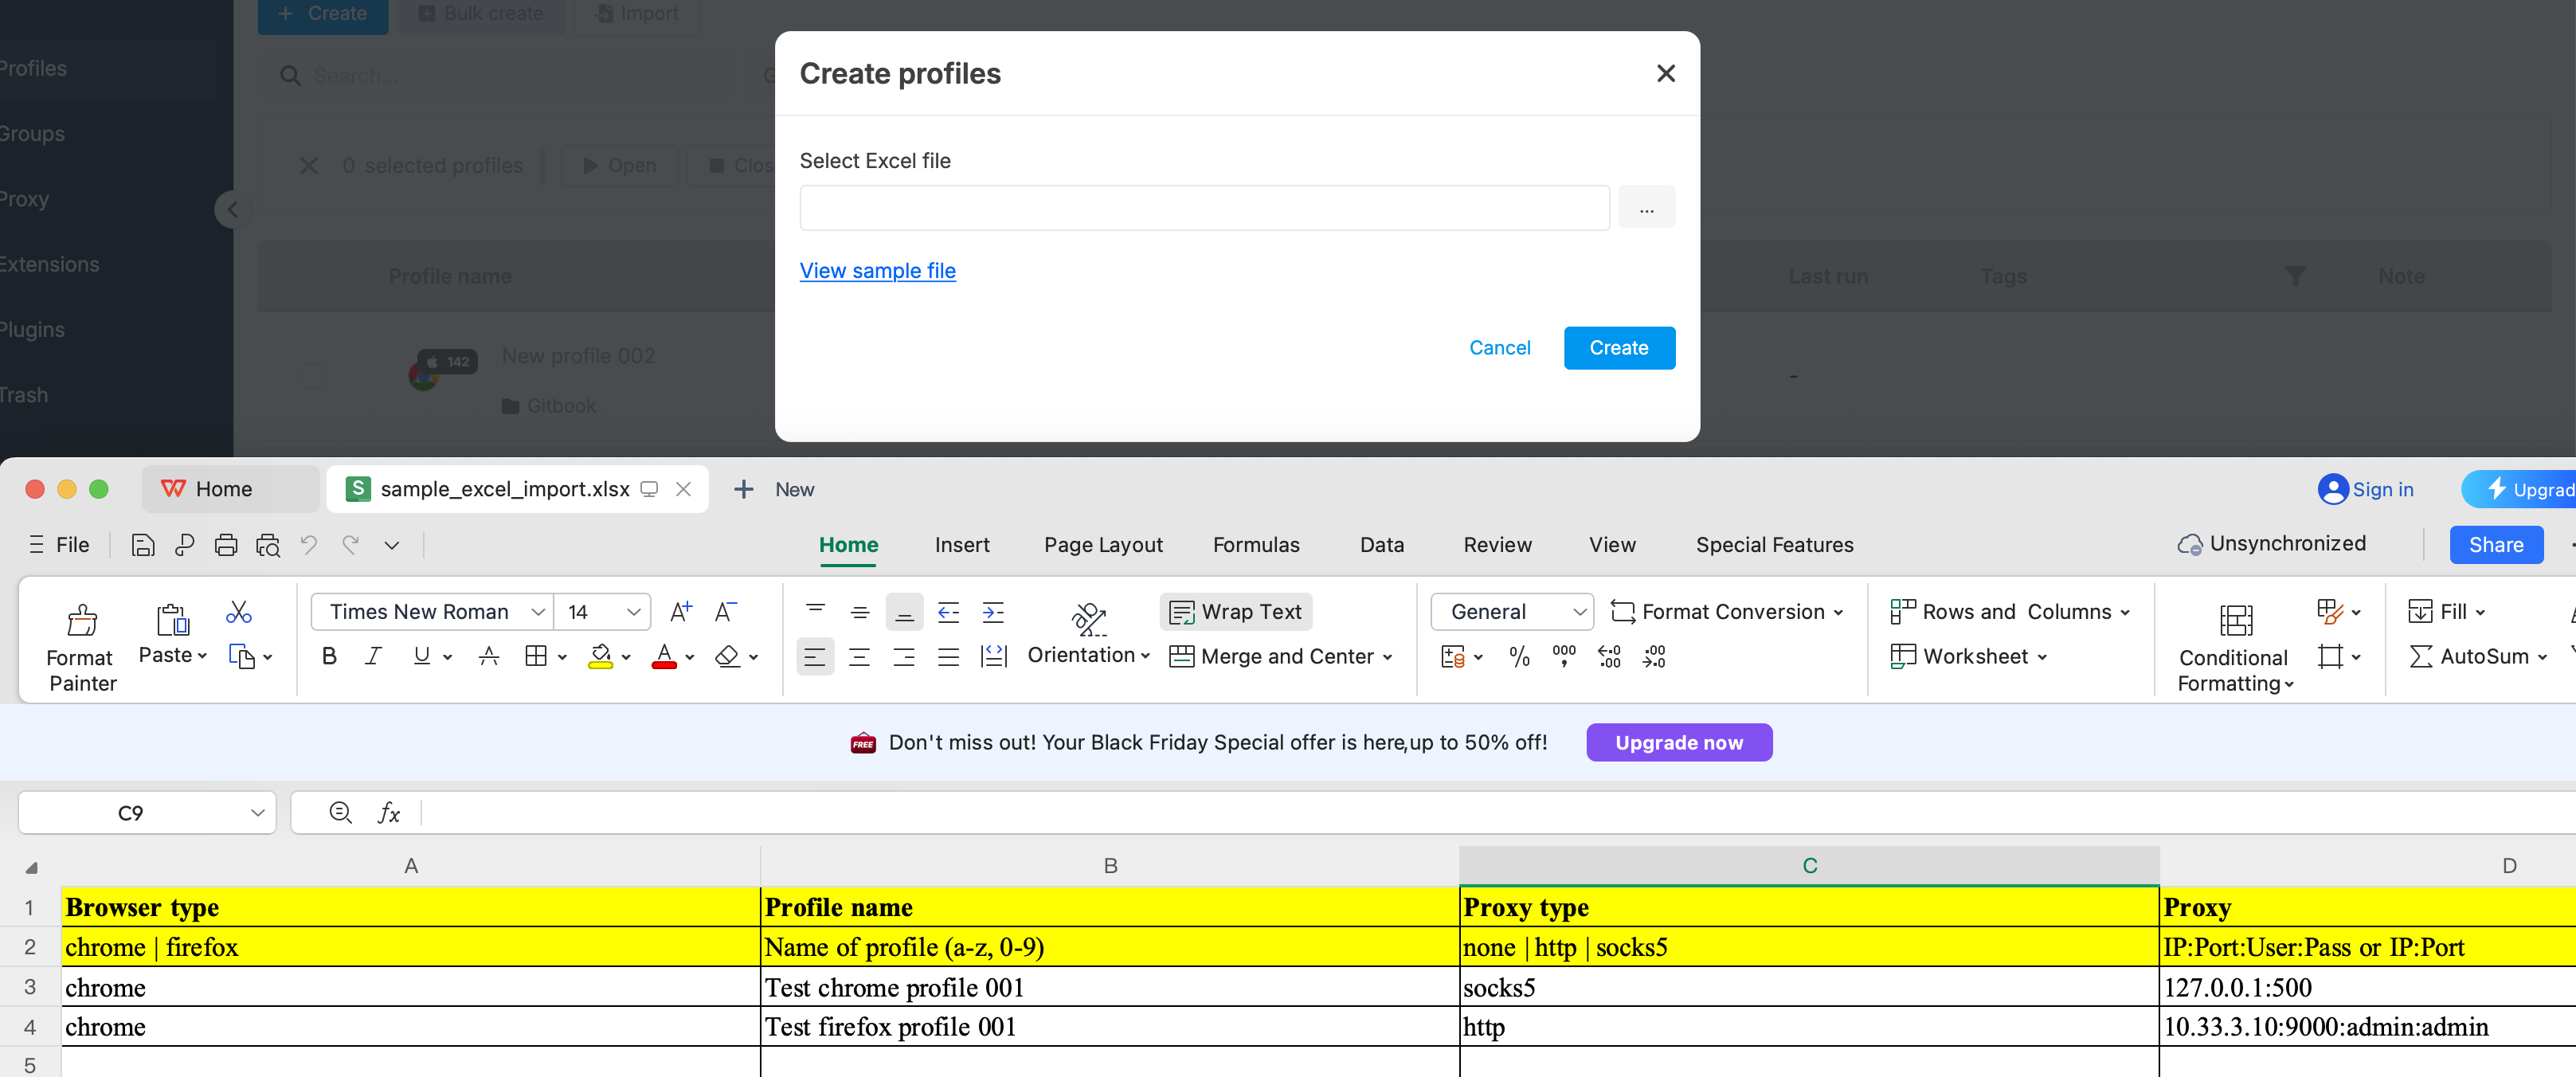
* Click the From Excel button; this allows you to mass-create profiles using pre-prepared data from an Excel file.
* You need to prepare an Excel file containing the profile information fields according to the template described in the image.
* Note for the User Agent column: If you are not sure, please leave this column blank. The software will automatically assign an appropriate User Agent based on the latest version of the GPM browser.
Detailed instructions for the proxy input structure are as follows:
* For http, simply enter `ip:port` or `ip:port:user:pass`
* *Example:* `sp08v5-us06.proxysystem.net:14021:sp08v5-14021:SRBJO`
* For socks, you need to add `socks4://` or `socks5://` in front.
* *Example:* `socks5://1:1:1:1:False` - For socks that do not support UDP, `socks5://1:1:1:1:True` - For socks that support UDP.
* For Route proxy (Contact to integrate Route Proxy: )
Proxy Provider
Automatically change proxy when opening profile
Do not automatically change proxy when opening profile